This guide will walk you through installing a cardano node on a minimal ubuntu 22.04 server installation. We will install webmin as a system configuration utility and cardano will be installed using the guild tools tool chain. A link to the guild website will be provided when we get to that section.
Install the Base OS
- Boot the Ubuntu server install from a USB drive.
- Select your language (English)
- If prompted that an updated installer is available, I recommend you tell it to use the updated installer.
- Select your Keyboard Layout and variant, select Done when complete.
- Next is the screen to select type of install. We are going to select Ubuntu Server (minimimed), so hit the Up Arrow and when the cursor is in the ( ) before the minimized selection, hit the spare bar. This should put in X in the (X). Press the down arrow to highlight Done and press enter.
- Configure your local network. Most of the time DHCP will get you a good address. For this system, I recommend using a wired network but wireless can be used as well. When configured, highlight Done and press Enter.
- Enter a proxy if needed. Most times this can be left blank. Highlight Done and press Enter.
- The next prompt if for the Ubuntu Archive Mirror. This is the location where the current files will be downloaded if you’re doing an online install. I recommend using the default. Highlight Done and press Enter.
- Configuring the installation drive is next. Unless you really know what you’re doing, I recommend selecting Use and entire disk, and I would NOT select Set up this disk as an LVM group. Highlight Done and press Enter.
- System will display the drive configuration it will create. Highlight Done and press Enter. THIS WILL COMPLETELY RE-FORMAT YOUR DRIVE ERASING ALL DATA. The system will warn you of this. Highlight Continue and press Enter.
- Enter your Name, Computername, Username, and desired password. Highlight Done and press Enter.
- Select Install OpenSSH Server. You may import SSH keys if you already have keys and know the process. If you do not import keys, you must have Allow password authentication over SSH selected. Highlight Done and press Enter.
- A list of optional software packages will now be displayed and you can select any that you need. Since we are going for a minimal install, I do not recommend installing any of the optional packages. Select Done and press Enter.
- The system will start installing the system. You can select View full log if desired, but overall wait patiently until the entire process completes. The install and update will be complete when the bottom command changes from Cancel update and reboot to Reboot Now. Highlight Reboot Now and press Enter.
- You will be prompted to remove the installation media. Do so and press ENTER.
- The system will reboot and generate the host SSH keys. Wait until the keys are created and boot information stops scrolling on the screen. Press Enter.
Update the software to the latest releases
- Login with the username and password you provided during installation.
- The initial system installation is now complete. Keep in mind this was a minimal installation, so almost nothing was installed. We will need to install many system utilities to make the system useful. Lets start by making sure the system is up to date. Enter:
sudo apt update
sudo apt upgrade- You will be again prompted for your password after the 1st command. On the upgrade command, if prompted to continue, type y and Enter. All of the installed software will be updated to the latest versions. This may take some time, wait until it completed.
- The system may ask you which services it should restart. I recommend restarting all of them with a range. My system had options 1 thru 10, so I entered 1-10 when prompted.
- I personally recommend rebooting the computer at this point, just to make sure all of the new code is running.
sudo rebootInstall additional tools
Several tools need to be installed to make your life easier. This was a minimal install, so nothing was installed by default. I recommend installing net-tools so you get the ifconfig application, iputils-ping for ping, bin9-utils for nslookup, apt-utils just because, iptables to enable filtering / firewall rules, nano for a text file editor, and lastly webmin for a graphical server management utility. I also added prometheus-node-exporter which optional, but if you want to monitor the server with prometheus it will be needed.
sudo apt install net-tools iputils-ping bind9-utils apt-utils iptables nano prometheus-node-exporter
wget http://prdownloads.sourceforge.net/webadmin/webmin_2.000_all.deb
sudo apt install ./webmin_2.000_all.deb
Now, you should be able to log into the webmin server from a local computer with this link.
https://<IP Address>:>10000/
You will likely get a warning about an untrusted site because webmin by default uses a self-signed SSL certificated. Accept the warning and go anyway. Enter your username and password when prompted. This is my preferred utility for managing linux servers.
Installing Cardano
We will be installing the guild tools version of Cardano. Their website is:
Guild Operators (cardano-community.github.io)
I strongly suggest you read their website. I’m not going to re-iterate it all here, but I’ll give the abbreviated version on the procedure.
Log into the server and from your home directory, enter the following:
cd
mkdir "$HOME/tmp";cd "$HOME/tmp"
curl -sS -o prereqs.sh https://raw.githubusercontent.com/cardano-community/guild-operators/master/scripts/cnode-helper-scripts/prereqs.sh
chmod 755 prereqs.sh
Now run the prereqs.sh script that was downloaded. The exact command will vary depending on which flavor you want to install. For a relay node, for the various networks, I recommend:
Preview: ./prereqs.sh -n preview
PreProd: ./prereqs.sh -n preprod
Mainnet: ./prereqs.sh -n mainnet
For a block producer node, I would recommend:
Preview: ./prereqs.sh -n preview -c
PreProd: ./prereqs.sh -n preprod -c
Mainnet: ./prereqs.sh -n mainnet -c
This will take several minutes to complete, even on a fast machine. You may be asked for your password since several of the command need to be run with sudo to complete.
Log out of the system then reconnect.
Install the node and cli
cd ~/git
git clone https://github.com/input-output-hk/cardano-node
cd cardano-node

git fetch --tags –all
git pull

# Replace tag against checkout if you do not want to build the latest released version
git checkout $(curl -s https://api.github.com/repos/input-output-hk/cardano-node/releases/latest | jq -r .tag_name)

# Use `-l` argument if you'd like to use system libsodium instead of IOG fork of libsodium while compiling
$CNODE_HOME/scripts/cabal-build-all.sh
Once everything finishes compiling, your system should be fully installed. You can validate this with the following commands:
cardano-node –version
cardano-cli –version
On my system, the following output was generated.
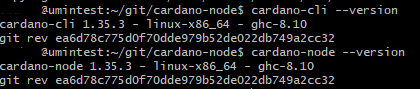
Your output may show different version information but both commands should run without an error and show the version information for the current release version of software.
Starting the node.
Next, lets start the node and let it download the blockchain. If you used preview or preprod this will go fairly fast. If you instead are bringing up mainnet, it will likely take a fully day to sync from scratch. There are locations where you can download an archive copy of the blockchain which greatly speeds up syncing to mainnet. I’ll attempt to find the link and include it here.
All of the control scripts are located in this directory. Move to it now.
cd /opt/cardano/cnode/scripts

# Lets start the cnode as a test.
./cnode.sh &
This will print a lot of information and the last like will likely be:
Listening on http://127.0.0.1:12798.
The node software should be running in the background at this point. If you press enter you should get a new linux command prompt. Enter:
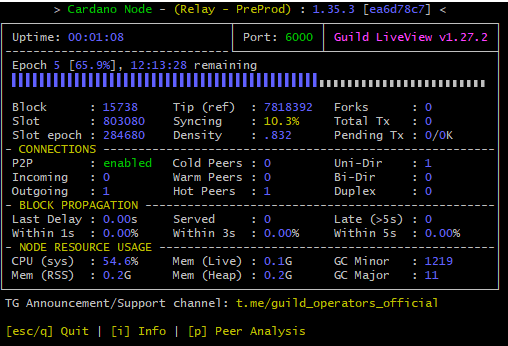
./gLiveView.shThis should bring up a window similar to what I show below. The software is downloading the blockchain from the internet, In my screen shown below, it says “Syncing : 10.3%”. This shows the percentage of the blockchain it has downloaded. Let this run until “Syncing” changes to “Tip (diff)”.
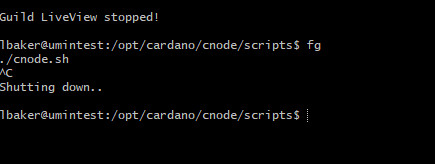
At this point, the blockchain should be fully downloaded. The last step for this guide will be setting the application to run automatically in the background. First, stop the gLiveView application but typing q.
Type fg
This will bring the cnode.sh application back into the foreground so you can stop the application. Type CTRL-C to stop the application.
To configure the system to run as a system service, enter:
./deploy-as-systemd.shThe program will ask if you want to deploy various optional services as well. If you are running your node in p2p mode (default for preview and preprod), then you do not need topology updater. If this machine will be a block producing node, I recommend saying yes to LeaderLog. For all others I would recommend answering yes.
To start the system running, enter:
sudo systemctl start cnodeEverything should start running in the background. You can verify node operation by running ./gLiveView.sh.
Conclusion
Now, you should have a fully running cardano node. The system is running on the default port of 6000. There are numerous other things you should do as a system administrator such as configuring firewall rules, both on the server itself and possibly externally on the internet router. A follow up article will be created to go over converting this to an active block producing node.
Questions and comments to pool@lbcrypt.com